Battery switch on travel trailer function is crucial for managing your RV’s power. Understanding how your battery switch works is key to preventing electrical problems and ensuring a smooth camping experience. This guide dives into the different types of switches, safe operation procedures, troubleshooting tips, and maintenance best practices, so you can confidently power your adventures.
We’ll cover everything from connecting and disconnecting your batteries safely to understanding how the switch interacts with your trailer’s other electrical components like the converter and inverter. We’ll even explore common issues and how to fix them, making sure you’re prepared for anything on the road.
Understanding Battery Switch Functionality in Travel Trailers
Your travel trailer’s battery switch is a crucial component for managing your power sources, ensuring efficient energy use and preventing accidental discharge. Understanding its function and proper operation is essential for a smooth and enjoyable camping experience.
A battery switch acts as a central control point for your trailer’s batteries, allowing you to disconnect them from the trailer’s electrical system when not in use. This prevents the batteries from draining completely, extending their lifespan and ensuring you have power when you need it. It also provides a way to switch between different battery banks, if your setup includes multiple batteries.
Battery Switch Types
There are several types of battery switches commonly found in travel trailers, each with its own advantages and disadvantages. The choice depends on the complexity of your electrical system and your power needs.
The most basic is a simple single battery switch. This type is used when you only have one battery powering your trailer. It’s a straightforward on/off switch, providing a simple way to disconnect the battery. A dual battery switch allows you to switch between two batteries or to disconnect both completely. This is useful if you have a house battery and a starting battery for your vehicle’s tow.
Finally, a rotary battery switch offers more options. These switches typically have several positions, allowing you to connect either battery individually, both batteries in parallel, or disconnect both entirely. Some more advanced rotary switches may even include a “battery combining” position that allows you to charge both batteries simultaneously from a single source.
Operating a Battery Switch
Operating your battery switch correctly is critical. Incorrect operation can lead to unexpected power outages or damage to your electrical system. Always refer to your specific switch’s instructions for precise details, as operation may vary slightly between models.
The general steps are as follows: First, locate your battery switch. It is usually found near the batteries themselves or within a convenient access panel. Second, identify the switch positions. Common positions include “Off,” “Battery 1,” “Battery 2,” “Both,” and “Combined” (depending on your switch type). Third, carefully turn the switch to the desired position.
For example, to disconnect the batteries completely, turn the switch to the “Off” position. To use only one battery, select the corresponding position (“Battery 1” or “Battery 2”). To use both batteries simultaneously, choose “Both” or “Combined” (if your switch offers this). Always double-check the position before leaving your trailer unattended for an extended period.
Advantages and Disadvantages of Different Battery Switch Types
The best type of battery switch depends on your needs. Let’s compare the options.
| Battery Switch Type | Advantages | Disadvantages |
|---|---|---|
| Single Battery Switch | Simple, inexpensive, easy to operate. | Only suitable for single-battery systems. No flexibility for switching between batteries. |
| Dual Battery Switch | Allows switching between two batteries or disconnecting both. More flexible than a single switch. | Slightly more complex than a single switch. Still lacks the combined charging option of a rotary switch. |
| Rotary Battery Switch | Offers multiple options including individual battery use, parallel use, and complete disconnection. Some models allow combined charging. | More expensive and potentially more complex to operate than simpler switches. |
Connecting and Disconnecting Batteries
Connecting and disconnecting your travel trailer’s house battery to the vehicle’s charging system is a crucial aspect of RV maintenance. Doing so correctly ensures proper charging and prevents damage to your battery and electrical system. This section details the procedure, safety precautions, and best practices for maintaining these connections.
The process of connecting and disconnecting your house battery involves working with potentially dangerous electrical components. Always prioritize safety. Incorrect handling can lead to sparks, burns, or even explosions. Take your time and follow the steps carefully.
Connecting the House Battery to the Vehicle’s Charging System
This usually involves connecting the battery to a charging system via a dedicated charging line from your tow vehicle or a shore power connection. Before beginning, make sure your battery switch is in the “OFF” position. Locate the positive (+) and negative (-) terminals on your house battery and the corresponding connections on your charging system. Connect the positive cable to the positive terminal, and then the negative cable to the negative terminal, ensuring secure connections.
Once connected, switch the battery switch to the “ON” position. This allows the charging system to begin supplying power to the battery.
Disconnecting the House Battery from the Vehicle’s Charging System
The process of disconnecting the battery is the reverse of connecting it. Begin by switching your battery switch to the “OFF” position. This cuts off power to the battery, preventing any electrical hazards. Then, carefully disconnect the negative (-) cable first, followed by the positive (+) cable. This order helps prevent accidental short circuits.
Always ensure the cables are properly secured before disconnecting to avoid accidental sparks or damage.
So, you’re planning a trip? Awesome! First things first: get yourself sorted with travel insurance. Check out Aon travel insurance for comprehensive coverage. Then, think about your in-flight entertainment. If you’re an audiophile, setting up your audiophile travel setup beforehand is key for a relaxing journey.
Don’t forget noise-cancelling headphones – a must-have for any serious music lover on the go!
Safety Precautions When Working with Batteries, Battery switch on travel trailer function
Working with batteries requires caution. Always wear safety glasses to protect your eyes from potential splashes of acid or sparks. Wear gloves to protect your hands from corrosion and acid. Ensure the area is well-ventilated to avoid inhaling potentially harmful fumes. Never allow metal tools to touch both battery terminals simultaneously, as this can cause a short circuit and potentially dangerous sparks.
If you are unsure about any aspect of this procedure, consult a qualified RV technician.
Maintaining Battery Connections to Prevent Corrosion
Corrosion on battery terminals is a common problem that can impede charging and eventually lead to battery failure. To prevent this, regularly inspect the terminals for corrosion. Clean any corrosion using a wire brush or a battery terminal cleaner. Apply a battery terminal protector to help prevent future corrosion. Keeping the battery box clean and dry also contributes significantly to preventing corrosion.
Consider using anti-corrosion grease on the terminals and connections for added protection.
Typical Travel Trailer Battery System Wiring Diagram
This table provides a simplified representation of a typical travel trailer battery system. Wire gauges and connection points may vary depending on the specific setup of your travel trailer.
| Component | Wire Gauge | Connection Point | Function |
|---|---|---|---|
| House Battery (12V) | 4 AWG | Battery Terminals | Provides power to the trailer’s 12V system |
| Battery Charger (Converter) | 8 AWG | Battery Terminals & Shore Power | Charges the house battery from shore power or vehicle alternator |
| Battery Switch | 8 AWG | Battery Terminals & Distribution Panel | Controls power flow to the house battery and trailer circuits |
| Distribution Panel | 10-14 AWG (varies by circuit) | Battery Switch & various trailer appliances | Distributes power to lights, appliances, and other 12V devices |
Troubleshooting Common Battery Switch Issues
Your travel trailer’s battery switch is a crucial component, ensuring you can power your appliances and systems. When it malfunctions, it can leave you stranded without power. This section Artikels common problems and their solutions, helping you diagnose and fix issues quickly and efficiently.
Troubleshooting a faulty battery switch involves a systematic approach. Start by visually inspecting the switch and its connections, then move on to testing the power flow. Remember to always disconnect the negative battery terminal before working on any electrical components – safety first!
Switch Failure to Operate
A battery switch that refuses to switch between positions (e.g., battery, both, off) is a common problem. This could be due to several factors. Internal mechanical failure within the switch itself is possible, as is a problem with the switch’s linkage or a corroded connection preventing proper operation.
To troubleshoot, first visually inspect the switch for any obvious damage, loose connections, or corrosion. Look closely at the linkage mechanism, ensuring it moves freely and isn’t jammed. Clean any corroded terminals with a wire brush and baking soda solution. If the problem persists, the switch itself might need replacing. It’s often easier and safer to replace the entire switch rather than attempt internal repairs.
Poor Electrical Connection
Weak or intermittent power, even when the switch appears to be in the correct position, often points to poor electrical connections. This can be at the switch itself, the battery terminals, or within the wiring harness leading to the switch.
Check all connections for tightness and corrosion. Use a multimeter to test the voltage at various points in the circuit. Compare the voltage readings at the battery terminals, at the switch’s input and output terminals, and at the appliances’ power supply. Significant voltage drops indicate a poor connection somewhere along the line. Tighten loose connections and clean any corrosion found.
If voltage drops remain, the wiring may need to be repaired or replaced.
So, you’re planning a trip? Awesome! First things first: get yourself sorted with travel insurance. Check out Aon travel insurance for solid coverage. Then, think about your in-flight entertainment; if you’re an audiophile, a great audiophile travel setup is a must-have for those long flights. Don’t forget noise-cancelling headphones! Happy travels!
Battery Switch Wiring Diagram
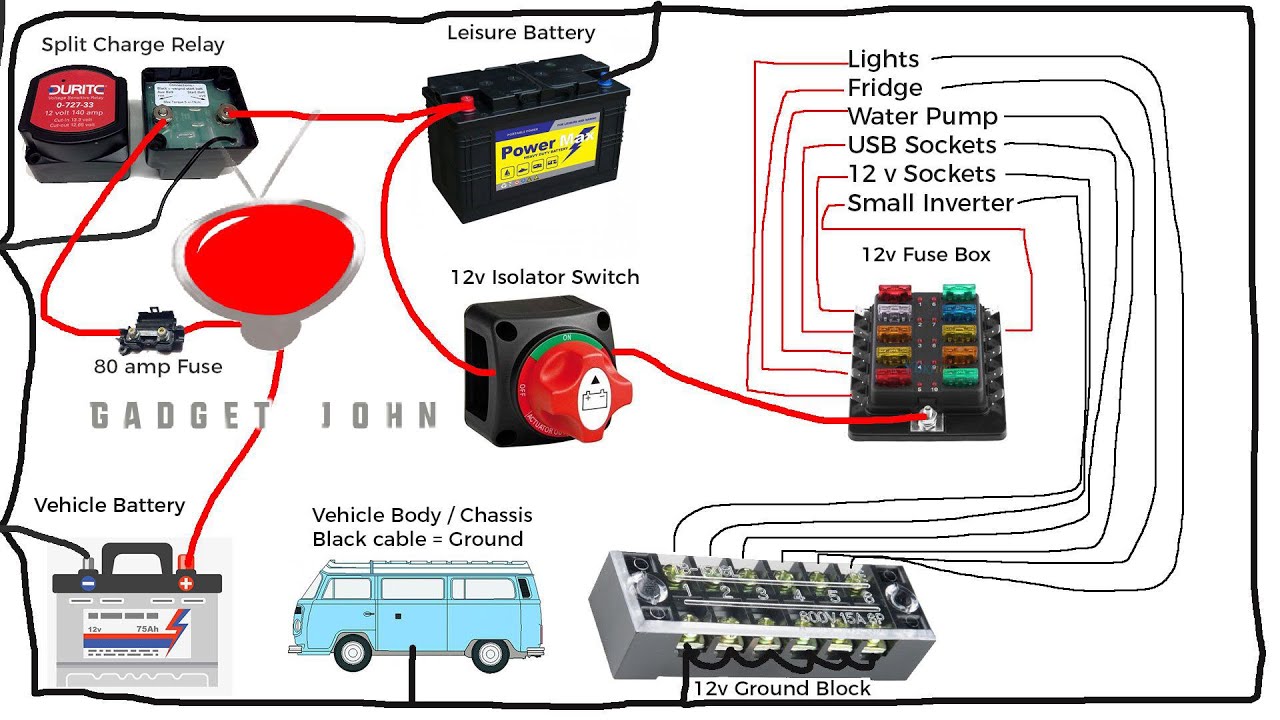
A simple diagram can greatly assist in troubleshooting. Imagine a diagram with three main sections: the battery (house battery and chassis battery), the battery switch (showing the various positions: Battery, Both, Off), and the trailer’s electrical system (appliances and lights). Arrows would illustrate the flow of electricity depending on the switch’s position. For example, in the “Battery” position, an arrow would show power flowing from the house battery to the trailer’s system, bypassing the chassis battery.
In the “Both” position, arrows would indicate power flowing from both batteries to the system. Tracing the power flow visually, based on the switch position and multimeter readings, can help pinpoint the exact location of a fault.
Flowchart for Troubleshooting a Non-Functioning Battery Switch
A flowchart provides a visual guide for a systematic troubleshooting approach.
The flowchart would begin with a decision point: “Is the switch operating correctly?” A “No” answer would lead to a series of steps: Visual inspection (loose connections, corrosion), cleaning connections, testing voltage at various points using a multimeter, checking the linkage mechanism, and finally, replacing the switch if all else fails. A “Yes” answer would indicate the problem lies elsewhere in the electrical system, outside of the switch itself.
Battery Switch Maintenance and Replacement
Keeping your travel trailer’s battery switch in top condition is crucial for reliable power. Regular maintenance prevents problems and extends the life of your switch, saving you time and money in the long run. Neglecting maintenance can lead to corrosion, poor connections, and ultimately, failure of the switch itself.Regular maintenance ensures your battery switch operates efficiently and safely, providing uninterrupted power to your RV.
A well-maintained switch minimizes the risk of electrical issues, preventing potential damage to your batteries or other components.
Battery Switch Maintenance Schedule
A proactive approach to maintenance is key. Here’s a suggested schedule:
- Monthly Inspection: Visually inspect the switch and its connections for corrosion, loose wires, or any signs of damage. Tighten any loose connections.
- Semi-Annual Cleaning: Use a wire brush and a battery terminal cleaner to remove any corrosion from the switch terminals and battery connections. Apply a corrosion inhibitor to protect against future corrosion.
- Annual Thorough Inspection: Conduct a more thorough inspection, checking for any signs of wear and tear on the switch itself. Consider testing the switch’s functionality with a multimeter to ensure proper operation.
Replacing a Faulty Battery Switch
If your battery switch fails, replacement is necessary. The process is relatively straightforward, but always disconnect the batteries before starting any work to avoid electrical shock.
- Disconnect the Batteries: This is the most crucial first step. Disconnect both the positive (+) and negative (-) terminals from both batteries.
- Remove the Old Switch: Carefully remove the old battery switch from its mounting location. This may involve removing screws or bolts. Take note of the wiring configuration before disconnecting any wires.
- Install the New Switch: Mount the new switch in the same location as the old switch. Secure it using the appropriate screws or bolts.
- Reconnect the Wires: Connect the wires to the new switch, ensuring they are connected to the correct terminals. Refer to the wiring diagram if necessary.
- Reconnect the Batteries: Carefully reconnect the positive (+) and negative (-) terminals to both batteries.
- Test the Switch: Turn the switch on and off to ensure it’s functioning correctly. Check all your appliances and systems to make sure power is working as expected.
Tools and Materials for Battery Switch Replacement
You’ll need the following to replace your battery switch:
- New battery switch (compatible with your system’s voltage and amperage)
- Screwdrivers (Phillips and flathead, as needed)
- Wrench (size appropriate for the switch mounting bolts)
- Wire brush
- Battery terminal cleaner
- Corrosion inhibitor
- Multimeter (optional, for testing)
- Work gloves
- Safety glasses
Preventative Maintenance Tips
Following these tips will help extend the life of your battery switch:
- Keep the battery switch area clean and dry. Avoid allowing water or other liquids to come into contact with the switch or its connections.
- Use a corrosion inhibitor regularly on the switch terminals and battery connections.
- Inspect the connections regularly for tightness and corrosion.
- Avoid excessive vibration or jarring that could damage the switch or its connections.
- Consider using a waterproof battery switch cover if your switch is exposed to the elements.
Mastering your travel trailer’s battery switch is a game-changer for any RV owner. By understanding its function, performing regular maintenance, and knowing how to troubleshoot problems, you’ll keep your power flowing smoothly, preventing frustrating breakdowns and ensuring enjoyable trips. So, get out there and enjoy the open road, knowing you’ve got your electrical system under control!
FAQ Guide: Battery Switch On Travel Trailer Function
What size wire should I use for my battery switch?
The appropriate wire gauge depends on the amperage of your battery system. Consult a qualified electrician or your trailer’s wiring diagram for the correct size.
How often should I clean my battery terminals?
Clean your battery terminals at least twice a year, or more often if you notice corrosion.
What happens if I accidentally leave the battery switch on while storing my trailer?
Leaving the switch on could drain your batteries, potentially causing damage. Always turn it off when storing your trailer for extended periods.
Can I use any type of battery switch in my travel trailer?
No, the switch must be appropriately rated for the voltage and amperage of your battery system. Using an incorrectly rated switch can be dangerous.
